Arduino Infrared (IR) Remote Driver Implementation
January 22, 2017
The Infrared Sensor
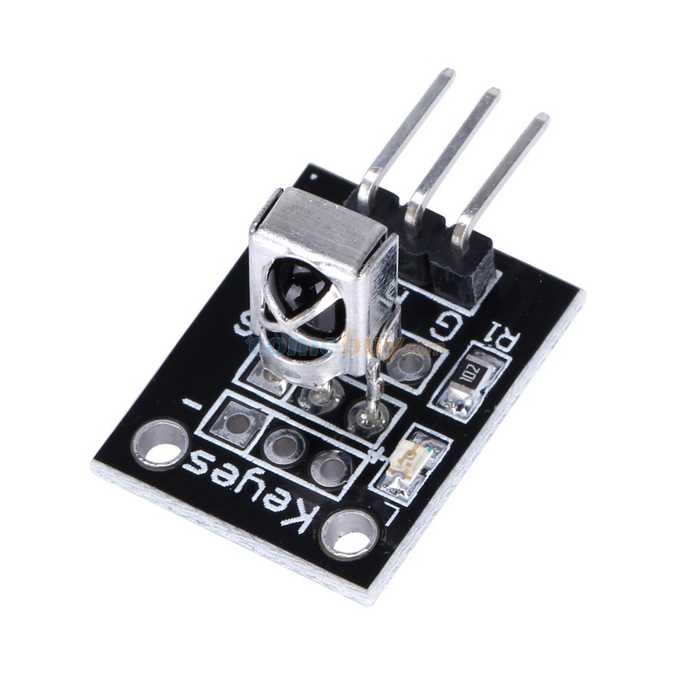
The IR Remote Receiver Electronic Module has 3 pins. From left to right they are (G) Ground, (V) Voltage, (S) Signal. BUT the marking sometimes varies on the little circuit board.
Interface
/**
 * Infrared Sensor Driver Interface
 *
 * @file ir_sensor_driver.h
 * @brief Infrared Sensor Driver Interface
 * @author Robert Meisner <robert@catchit.pl>
 * @version 1.0 2016-12-22
 */

namespace CatchIT
{
class IRSensorDriver
{
public:
  virtual void init() = 0;
  /**

  + Class constructor.

  */
  IRSensorDriver() {}
  /**

  + Return true if sensor has received new value
  + @return bool

  */
  virtual bool received() = 0;
  /**

  + Returns last value received
  + @return int

  */
  virtual int value() = 0;

protected:
};
};
Implementation
/**
 * "Keyes" Infrared Sensor Driver Implementation
 *
 * @file keys_ir_sensor_driver.h
 * @brief Infrared Sensor Driver Implementation
 * @author Robert Meisner <robert@catchit.pl>
 * @version 1.0 2016-12-22
 */
#include <IRremote.h>
#include "ir_sensor_driver.h"
namespace CatchIT
{
class KeyesIRSensorDriver : public IRSensorDriver
{
  public:
    /**

          * @brief Class constructor.
          * @param distance The maximum distance in centimeters that needs to be tracked.

          */
    KeyesIRSensorDriver(int pin) : IRSensorDriver()
    {
        irrecv = new IRrecv(pin);
    };
    void init()
    {
        irrecv->enableIRIn();
    };
    bool received()
    {
        if (irrecv->decode(&results))
        {
            // I have received an IR signal
            // Serial.println(results.value, HEX);
            lastValue = results.value;

            irrecv->resume();
            return true;
        }
        return false;
    }

    int value()
    {
        return lastValue;
    }

    int lastValue = 0;

  private:
    IRrecv *irrecv = NULL;
    decode_results results;
};
};
The Remote
We will use the remote to control the movement of our robot.(UP, DOWN, LEFT, RIGHT buttons) and toggle autonomous mode (HASH). In fact, you can assign any button on your remote to control these.
Decode your remote’s codes
While every IR remote has different codes assigned to every button you have to detect them for yourself. To detect the codes, upload this code to your Arduino, open Serial Monitor in Arduino IDE and write down the codes. Finally, you need to update the correct values in remotes implementation below.
#include <IRremote.h> //include the library
//PIN
int receiver = 12;
IRrecv irrecv(receiver); //create a new instance of receiver
decode_results results;
void setup() {
 Serial.begin(9600);
 irrecv.enableIRIn(); //start the receiver
}
void loop() {
 if (irrecv.decode(&results)) { //we have received an IR
 Serial.println (results.value, HEX); //display HEX
 irrecv.resume(); //next value
 }
}
Implementation
/**
 * Infrared Remote Driver Implementation
 *
 * @file keys_ir_remote_driver.h
 * @brief Infrared Remote Driver Implementation
 * @author Robert Meisner <robert@catchit.pl>
 * @version 1.0 2016-12-22
 */
#include "keyes_ir_sensor_driver.h"
#define KEY_OK 0x16E9
#define KEY_HASH 0xFF52AD
#define KEY_UP 0x6F9
#define KEY_DOWN 0xFFFF8679
#define KEY_LEFT 0xFFFFA659
#define KEY_RIGHT 0x46B9

namespace CatchIT
{
class KeyesIRRemoteDriver
{
  public:
    KeyesIRRemoteDriver(int pin)
    {
        sensor = new CatchIT::KeyesIRSensorDriver(pin);
    }
    void init()
    {
        sensor->init();
    }
    bool keyPressed()
    {
        if (sensor->received())
        {
            keyValue = sensor->value();

            return true;
        }
        return false;
    }

    bool isUp()
    {
        return keyValue == KEY_UP;
    }
    bool isDown()
    {
        return keyValue == KEY_DOWN;
    }
    bool isLeft()
    {
        return keyValue == KEY_LEFT;
    }
    bool isRight()
    {
        return keyValue == KEY_RIGHT;
    }
    bool isOK()
    {
        return keyValue == KEY_OK;
    }
    bool isHash()
    {
        return keyValue == KEY_HASH;
    }
    int value()
    {
        return keyValue;
    }

  private:
    int keyValue = 0;
    CatchIT::KeyesIRSensorDriver *sensor = NULL;
};
};
Example Arduino Code
IR Remote Receiver - connect to Arduino
/*
 Distance
 Reads a distance, prints the result to the serial monitor
*/

#include "keyes_ir_remote_driver.h"
// pin of the receiver
int recvPin = 12;
UsefulDrivers::KeyesIRRemoteDriver *driver = new UsefulDrivers::KeyesIRRemoteDriver(recvPin);

// the setup function runs once when you press reset or power the board
void setup()
{
    // initialize serial communication at 9600 bits per second:
    Serial.begin(9600);
    // put your setup code here, to run once:
    driver->init();
}
// the loop function runs over and over again forever
void loop()
{
    bool keyPressed = driver->keyPressed();
    if (keyPressed)
    {
        Serial.print("Remote value: ");
        Serial.println(driver->value(), HEX);
    }
}
All the up-to-date code is always available in the GitHub repo:

