
3D Printed Case (Modular!) for your DIY Project
November 28, 2016
Every time I build a DIY project I stumble upon the need to encase it. There is plenty available 3D Printed Case designs online but none truly met my needs for simplicity and modularity. This pushed me to design the case tailored exactly to my needs.
Business requirements
We need the project’s casing to:
- enclose all the circuit parts
- be easily extended with additional sensors, motors, and functionalities
- be easy to modify
- be easy to disassemble all the parts
- limit the need for soldering and gluing
- be 3D printed without support and bridges
- be KISS (Keep It Simple, Stupid)
3D Printed Case’s body
First, let’s define some variables used to describe the 3D printed case’s size and properties.
$fn = 100; // resolution
clearance=0.25; //clearances for 3D printing to make parts easily fit where needed
width = 68.6+3; //width of the case(X)
depth = 53.3+3; //depth of the case (Y)
depthSpace = 5; //little space on both sides of the case to store loose wires and make it easier to fit components
height = 35; //height of the case (Z)
indentHeight = 2; // tells us how far the cover overlaps the case
wallWidth = 3; // wall width
Next, let’s build the box using variables we just defined.
//build a box
linear_extrude(height, convexity = 10) {
          offset(r = wallWidth)
          square([width, depth + (2 * depthSpace)], true);
        };
}

Now we can cut the working space, where we can place our Arduino, Raspberry Pi or any other components. Measurements used here should match Arduino Uno.
 difference() {
        //build a box
        [...]
        // cut a working area space
        translate([0, 0, wallWidth]) linear_extrude(height, convexity = 10) square([width, depth], true);
}
We can now cut some space for excess wires. We will keep the pillars which should make our case more sturdy.
difference() {
        //build a box
        [...]
        // cut a working area space
        [...]
        // cut a space on the sides of the working area
        // can be used to hold an excess wires
        for (i = [-1, 1])
          translate([0, i * (depth / 2 + depthSpace / 2), wallWidth]) linear_extrude(height, convexity = 10) square([width - 2 * depthSpace, depthSpace], true);
}

Cut the screw holes in the pillars. We will use those to screw the body and a cover together.
 difference() {
    //build a box
    [...]
    // cut a working area space
    [...]
    // cut a space on the sides of the working area
    // can be used to hold an excess wires
    [...]
    // add the screw holes
    for (i = [
        [-1, 1],
        [1, -1],
        [-1, -1],
        [1, 1]
      ])
      translate([i[0] * (width / 2 - depthSpace / 2), i[1] * (depth / 2 + depthSpace / 2), height - 4 / 5 * height]) linear_extrude(4 / 5 * height, convexity = 10) circle(d = 2.5);
 }

Next step is to cut the indent in which the cover will slide in.
 difference() {
    //build a box
    [...]
    // cut a working area space
    [...]
    // cut a space on the sides of the working area
    // can be used to hold an excess wires
    [...]
    // add a screw hole
    [...]
    // cut an indent at the upper edge of the box
    color("green") translate([0, 0, height - indentHeight])
    linear_extrude(indentHeight, convexity = 10) difference() {
      offset(r = wallWidth) square([width, depth + 2 * depthSpace], center = true);
      square([width + wallWidth, depth + 2 * depthSpace + wallWidth], center = true);
    }
}

The Connector
As your project grows and evolves u might need more space in your box. We want the case to be KISS, so let’s just print one more box with different or the same dimensions and join boxes together. How? Here comes an ancient woodworking technique. A dovetail joint or simply dovetail is a joinery technique most commonly used in woodworking joinery (carpentry).
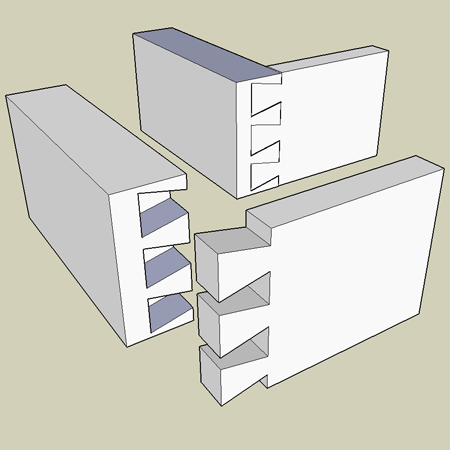

We want to create a dovetail cuts on the opposite walls. We will use those to:
- pull the wires between the boxes.
- join boxes together with slide-in connector
- air cool your project - which might be important for certain electrical circuits.
As we will use it very often we will encapsulate the code in the module for re-use purposes.
/**
* Dovetail shape used to cut a hole in the walls and generate a double sided dovetail connector
*/
module dovetail(max_width = 5, min_width = 3, depth = 5, height = 20) {
  linear_extrude(height = height , convexity = 2) polygon(paths = [
    [0, 1, 2, 3, 0]
  ], points = [
    [-min_width / 2, 0],
    [-max_width / 2, depth],
    [max_width / 2, depth],
    [min_width / 2, 0]
  ]);
  echo("angle: ", atan((max_width/2-min_width/2)/depth));
}

Finally, let’s create the connector. We just create two dovetails, mirror one and join them together. You want the connectors to be slightly smaller than the holes so they fit closely and at the same time are easy to slide in and out . Let’s use “clearance” variable to create little space between walls.
/**
* Generates a double sided dovetail connector
*/
module dovetailConnector(){
    union() {
        dovetail(max_width = 5 - clearance, min_width = 3 - clearance, depth = wallWidth, height = height/2 - indentHeight);
        mirror([0, 1, 0]) dovetail(max_width = 5 - clearance, min_width = 3 - clearance, depth = wallWidth, height = height/2 - indentHeight);
    }
}

for (i = [1 / 5, 2 / 5, 3 / 5, 4 / 5]) color("red") translate([(width * i), (1.2* depth + depthSpace + wallWidth)]) rotate([0, 0, 180]) {
      dovetailConnector();
  }

3D Printed Case’s Cover
So we’ve got the boxes we can change, duplicate and join together. Now let’s design a cover.
First, create the box with height=wallWidth + indentHeight and two other dimensions same as the box.
 // create cover box
    linear_extrude(wallWidth + indentHeight, convexity = 10) {
      offset(r = wallWidth)
      square([width, depth + (2 * depthSpace)], true);
    };

Next cut the indent so u can interlock the case with the cover.
difference() {
    // create cover box
    [...]
    // cut the indent to slide a body in
    linear_extrude(indentHeight, convexity = 10) square([width + wallWidth + clearance, depth + 2 * depthSpace + wallWidth + clearance], center = true);
}

And finally cut the screw holes in corresponding positions to the case’s ones.
difference() {
    // create cover box
    [...]
    // cut the indent to slide a body in
    [...]
    // cut the screw holes
    for (i = [
        [-1, 1],
        [1, -1],
        [-1, -1],
        [1, 1]
      ])
      translate([i[0] * (width / 2 - depthSpace / 2), i[1] * (depth / 2 + depthSpace / 2), 0]) linear_extrude(wallWidth + indentHeight, convexity = 10) circle(d = 2.5);
  }

Final result
Let’s put all parts together of our 3D Printed Case.

Here you can see how to use dovetail joints with two Modular 3D printed cases.

This is a base project. Take a look how can you easily extend it for your custom project: 3D Printed Case for Living Green Wall Project
You can find latest source files along with some examples how to modify this basic design at Github: https://github.com/robertmeisner/modular-3d-printed-case
The STL files are available at: http://www.thingiverse.com/thing:1923616